These high
school ceramics students are clay prospecting. They not only made
pottery from the clay, they built a kiln and wood fired the pots in the
kiln. Eric Good Kaufmann, their teacher, is an accomplished potter and teaches art at Bethany Christian High School, Goshen, Indiana, USA. Mr. Kaufmann is an alumnus, class of '97, Goshen College.
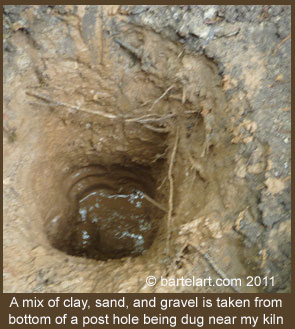
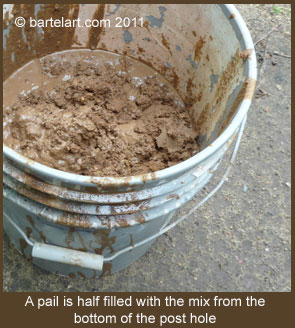
PROCESS to REWORK good clay that becomes too dry to use. Processing self-dug clay follows below and self-dug clay is shown in the photos to the left on this page.
- To reprocess hard clay
it must first be totally dry. There is no need to break up dry clay.
PRECAUTIONS:
Be sure it has no plaster chips in it - plaster causes pop-outs when bisque
fired. Leather hard clay or moist clay does not slake well because it
is not porous like dry clay is. Instruct students to handle the dry
clay without making dust. Airborne dust is not healthy to breath. Other contaminants such as paper, sponges, and so on, may cause mold to form in the clay, in addition to being a nuisance in the clay.
see health hazards page
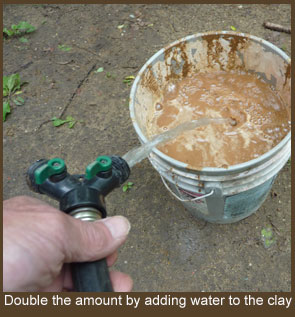
- Place the totally dry lumps in clear water in
something like garbage cans. Use enough water so clay is totally under
water. Just let it set in clear water.
- Never stir it. Stirring clogs up the porosity and
prevents good slaking (soaking to mush).
- In a few days or less,
even huge chunks of dry clay will slake to mush. Go to step 6 below and dry it enough to use as in steps 7, 8, and 9.
SELF-DUG CLAY VARIATION
If you dig clay yourself, it often has impurities that need to be removed. Most
kids love to help with this and there are few better learning
experiences. If you are a teacher, invite students to bring in samples
for testing. If it works well, ask them to bring more.
- Let the clay become totally dry.
- Slake it as described in 3 above.
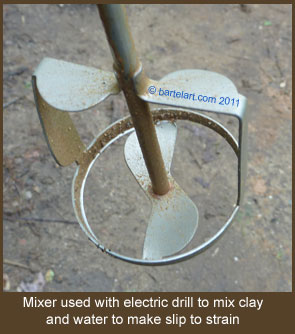
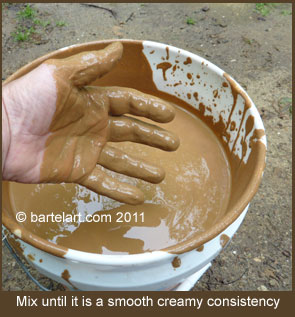
- When it is all soft and mushy, stir it until it is a slip. I use a mixer on an electric drill or a
blunger. Add water if needed to liquefy it.
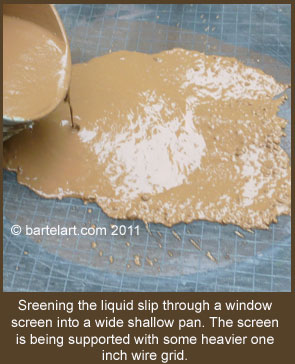
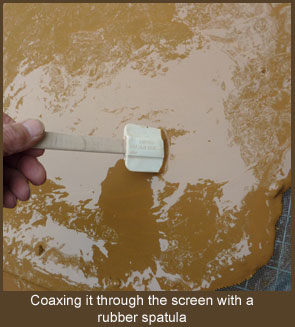
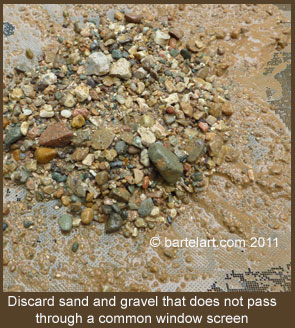
- Pour the slip through ordinary window screen available at any building supply store.
- The
screening removes stones, roots, and other trash that causes trouble.
The chief culprit is limestone. Limestone, like plaster, pieces cause
pots to break after firing.
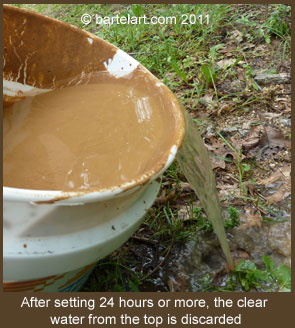
- When the clay has settled and turned
to mush, remove extra water from top. Dip water off or siphon it off.
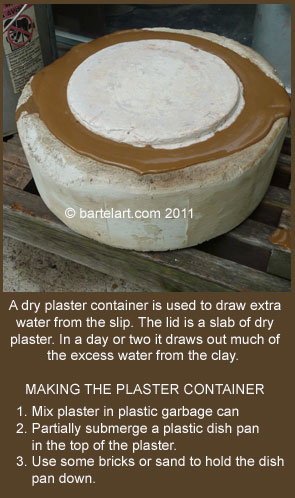
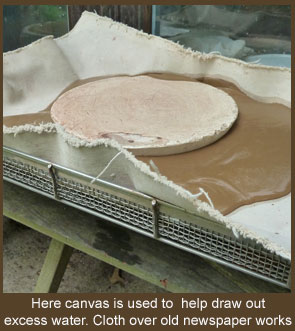
- Spread the mush a few inches thick on clean
dry porous surfaces. I use, dry plaster, clean concrete, canvas, denim,
etc. Smooth the top to avoid getting small dry pieces on the
surface.
- If you want it to dry faster, use a fan and/or set it all on a wire rack to allow air under it.
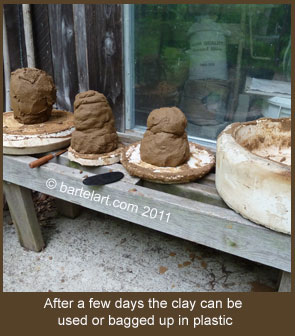
- When it is nearly dry
enough,
I make coils as thick as my arm and set them around like big arches (a
foot
tall) and they are ready to wedge and use in 24 hours or less.
This
clay can be stored forever in an airtight plastic.
In ancient China, potters stored moist clay in caves for
the next generation to improve the plasticity of the clay. If it is to be stored long-term, double wrap it.
Double wrapping in plastic bags from the supermarket works. Students
can bring in hundreds of these.
notes on digging clay
WHERE IS CLAY? - Check stream banks,
construction sites, roadway cuts, and any place that gets slippery
after a
rain and sticky as it starts to dry. When dry, it is nearly
rock-hard. Many of us can find clay under the topsoil in our back yards.
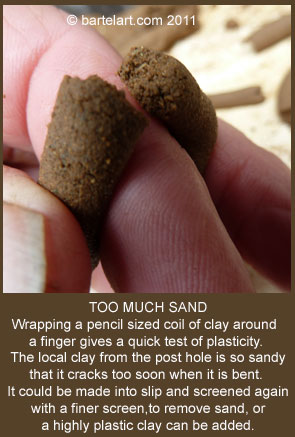
PLASTICITY
- Some clay is too sandy and some is too sticky. When I prospect I look
for clay that can be rolled between my hands into a pencil thick coil
of soft clay and wrapped around my finger without cracking. If the coil
cracks, it may be too sandy or its clay particles may be too large.
Sticky clay tends to be cling to my hands too much. It will often have
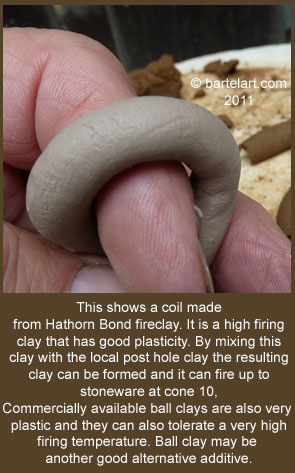
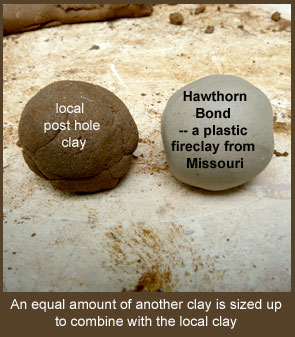
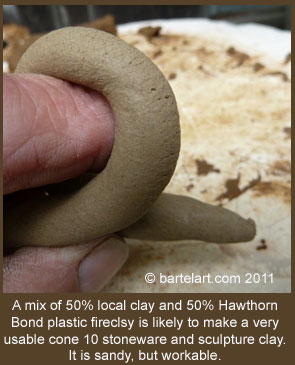
severe drying shrinkage and tend to crack during drying. Potters often blend several clays to get the right properties. See photos on left.
Commercial
clays
can be added to balance the mix. Commercial ball clay adds plasticity
(so it is
less apt to crack when bending it). On the other hand, crude
ground fireclay, china clay (kaolin) fine sand, and/or grog reduce
plasticity (make it less sticky and shrink less). Do a web search of
"ceramic chemicals and clay" for sources of commercially available clay
types near you. See photos on left.
IMPURITIES -
Most common clay contains impurities,
often in the form of iron oxide, sand, roots, and other debris. Troublesome impurities can be removed by
making a thin slip. The sand settles to the bottom first. Allow the
sand to settle a short time. Then decant the clay water (the good slip
from the top down to the sand) and discard
the sand in the bottom. Allow the clay (slip) to settle and process it
as
described in the 9 steps above.
Iron impurities are very common and not easily
removed. Iron
gives it the reddish brown color when fired and causes the clay to melt more
easily. It may not work for stoneware,
but most common clays are fine for earthenware. Most of it will fire to cone 05 without problems.
GOOD USES OF IMPURE
CLAY - Potters who make high fire stoneware sometimes add small amounts
of impure local clay to their clay body to add character and blemishes.
I regularly add some common brick clay to add character to my pottery.
Color and iron spots look more natural and give a warmer feeling.
Stoneware potters also
use local clay as a source of glaze material. These "slip glazes" have
been used for hundreds of years for lining jugs and traditional
crockery.
AESTHETICS OF SELF-DUG CLAY: Most native self-dug clay fires to
look like common clay flowerpots. Some potters burnish it (rub the
nearly dry pieces with a polished stone or back of a spoon). Some
Native American potters make beautiful
polished black pottery from
self-dug clay. Black is achieved by smothering the fire at the end
with ashes so that no air reaches the hot pottery and the carbon from
remaining fuel blackens the pottery. Typically, tribal pottery is not
glazed and is fired without kilns. Sometimes the potters use colored and
white clay (slip) to decorate. Search (Google) Terra Sigillata for more information on how to get a highly polished surface without glaze.
HINT: Clay that is thick or not dry enough often explodes as moisture
turns to steam when it heated rapidly. If this happens, make it thinner,
dry it better, heat it slower at first, and/or add something like sand
to the clay to open the clay body more and let the steam out.
OUTDOOR FIRING WITHOUT A KILN
Responsible Adult Supervision is Required
Never leave an outdoor fire unattended
Never fire if there is any chance of a wildfire
Have emergency fire quenching equipment on hand
Leave the site cleaner than you found it
Obey all laws and codes
WHY IS CLAY FIRED?
Clay becomes pottery at temperatures at about 1,000 degrees F (the
beginning of glowing red heat - about 540 C). Traditionally, tribal earthenware
is fired to about 1,400 degrees F (760 C). Heat removes the molecular
water in the clay. The heat converts clay molecules to molecules that do not dissolve or slake in water. In modern societies pottery and brick is
fired in kilns to temperatures ranging from 1,800 F to 2,400 F. Most of the
common clays like clay shown here on the left found in our back yards start to deform and melt if they are fired higher than
about 1,900 F. Modern toilets are fired from clay that has fewer contaminants. It is fired to 2,300 to 2,400 F., making it very strong and impervious.
FIRING WITHOUT A KILN
Kilns were invented to contain heat to reach higher temperature with less fuel. In tribal settings it is traditional to use an outdoor bonfire type of
firing that is fueled with enough wood kindling under the pottery to
exceed red glowing heat during the burn. The tempreatures of the pottery reach 1,000 F and hotter.
WHERE and how to do it SAFELY. Consider fire safety and local fire codes. Many cities and communities are very strict about open fires. In any case, do not do this where there is any chance that the fire will spread from your firing. Have an ample supply of water close at hand. Have a shovel and dirt that can quickly be used to put out an accidental fire. Do not leave it unattended. Teach careful and strict safety habits to children and students. Temperatures are much hotter than a cooking fire.
THE 'UNKILN' CONSRUCTION STEPS
1. The 'unkiln' firing begins with a pile of dry kindling wood. Some potters put this in a shallow pit or within a ring of steel, brick, or stone. In any case clean the area to prevent fire spread.
2.
A stack of pottery is carefully piled on top of the kindling wood. Stack it so you think it will survive as the wood burns and your pots tumble into the ashes. Optionally, you can try supporting the pottery pile with some carefully placed supporting stones, bricks, or some old pieces of fired pottery; but leave plenty space for kindling to fuel the fire.
3. OPTIONAL: Some potters
place broken pot pieces over the pottery pile. You can also cheat with some scraps of tin roofing, flattened tin cans, etc. Leave a generous exhaust opening at the top and several combustion air opening at the base around the perimeter.
4.
Cover it with a thick layer of natural
material such as tall green swamp grass or animal dung to hold the heat in. Some moisture in the dung and grass keeps it from burning off too soon. This
insulating layer holds the heat in long enough to fire the clay, but it does also burn toward the end of the firing.
5.
OPTIONAL: In some cases, this insulation layer is smeared with a coating that forms a thin shell. This
shell can be made of a clay/sand/straw or grass mixture.
6.
A generous exhaust hole
is provided at the top of the mound and several vent openings are provided
around the bottom so the wood gets air and burns with enough gusto that the clay
gets red-hot. The size depends on how large your firing is. The openings around the bottom provide a place to ignite
the wood and allow adequate combustion air to enter. The top opening
needs to be large enough to allow rapid air flow to enter at the bottom
and small enough so the heat is contained.
FIRING
1. Light the kindling with some wads of paper at the vents. OPTIONAL (if worried about breakage): As soon as you are sure the wood is burning, you can cover the top vent partially with some tin or pottery shards to restrict the burn and heat the contents slower at the beginning. Open this up soon enough to allow most of fuel to burn rapidly and very hot. Most of the fuel is needed to reach a high enough temperature to fire the clay.
2. OPTIONAL: When the fuel is all burned, cover it immediately with a layer of dry dirt (if you have wood ashes these also work). This chokes off the air so the pots come out smokier and darker. Some potters can get totally black pottery this way.
3. When it has cooled to about 500 F or cooler, feel free to use sticks to carefully probe and role out your hot treasures.
TROUBLE SHOOTING
Mistakes happen, but enjoy the process. Think about it and try again. Many mistakes turn into new ideas and possibilities.
Breakage problems?
Experiment and learn. Steam pressure is what breaks most pots. If pots are not made to a uniform thickness, they sometimes crack because the drying shrinkage varies. If pots break it may mean they are too thick or the clay needs some opener. Sand or grog in clay is an opener. It allows the moisture to steam out (to escape easier) at the early stages of heating. Sand must not include any limestone. After firing, clay pieces will pop off as the pieces of lime contaminants expand by absorbing atmospheric moisture.
Modern computer controlled electric kilns use a prolonged heating stage at 200 degrees F. This is just below the point at which moisture turns to steam. Clay that is fired fast must be TOTALLY dry before it hits the steam forming temperature. This prevents the clay explosions that often happen when clay is heated to too rapidly.
When firing without a kiln, it may help to pre-dry you clay pieces in a kitchen oven set to 190 degrees F. With a kitchen oven, the pots are dried by "baking" below the boiling temperature of water for several hours. I set the oven to 190 F. This is NOT firing the pots, but it dries them so they can be fired in an outdoor bonfire or pit firing with less breakage caused by steam explosions.
CAUTION: A kitchen oven cannot be set hot enough to fire pots. Firing pots in any indoor stove is never recommend. It may cause a house fire. The temperatures needed to fire clay are too hot (1,000 F degrees and hotter). This temperature would make any stove red hot and it would exceed the safety designed into any stove. This is much hotter than a self-cleaning oven reaches when it burns the residues in a dirty oven. Clay does not change to pottery unless it is fired to 1,000 F (red hot) or hotter.
What if the fired pots dissolve in water?
This means that the fire was not hot enough. Tribally fired pottery is often fired to about 1,400 F. Clay converts to pottery at about 1,000 F. The water that evaporates as clay dries is
simply physical water. However, at about 1,000 F, the chemical water is removed. This produces a molecular change--making the clay into a stone-like substance that no nolonger softens in water.
What if you don't like the color and texture?
Pit fired and bonfire pots have natural variations. These are not defects. Experiment. Pay attention to everything. Try burnishing. Try coatings. Never use toxic stuff on the inside of pottery that might be used for food or drink by anybody now or in the distant future.
If you like boring and reliable uniformity, use an electric kiln.
What if water seeps through the pot?
This is not a defect. Pit fired pots without glaze on them will all be porous and some water will soak through, but the structure of the clay will be okay if it was fired hot enough. If I want to use a porous pot for a vase, I warm it in an oven and then seal the inside with melted wax by pouring melted paraffin wax in and out of the pot. Porous pottery is used for self-cooling water jars that keep the contents cold by evaporation on the exterior. Porous pottery is also used to filter water. Colloidal silver is added to water filters to help eliminate bacteria. If you do this, buy it from a reputable business (some websites have sold unsafe fake materials as colloidal silver). Water filters are typically fired in kilns in order to reach the correct temperature to function properly. This link has more on porous pottery filtration for drinking water.
http://www.potterswithoutborders.com