For the Mac Resource Page, click here.
For Windows projector help, click here.
- Contents included in each laptop bag:
- 13″ MacBook Pro Laptop (with battery)
- AC Adaptor/Power Cord
- USB Optical Wheel Mouse
- Mini Display Port to VGA Adaptor
- Instruction Sheet
- Sheets included in each laptop bag:
- Laptop Instructions 2011 (Word docx)
- Laptop Agreement (Word doc)
Wireless Internet Troubleshooting
- Make sure you are connected to a wireless network. To do this, look at the bottom right hand corner of the screen. As seen in the picture, there are utility icons to the left of the clock: you are looking for the icon that appears as an ascending bar graph (in the photo, there is a red arrow pointing to the icon. the red arrow was added to the photo, it will not appear on your screen).

If the bars do not appear filled in with white, you are not connected to the internet (the number of bars highlighted indicate signal strength. If at least one is filled in, you have internet access). If the bars have at least one filled in and you are unable to use the internet, click on the “bar” icon (as seen in the picture) and it will ask for your GC username and password for verification OR open a web browser and it will prompt you for your username and password. Once you enter this information, you should have access to the internet. - If no bars are highlighted, a yellow icon will appear on top of the empty bars as seen in the example photo below. This signifies that you are not connected to any wireless network but that there is a network available to which you can connect. (NOTE: if the “bars” icon appears with a red X over the empty bars, this signals there are no wireless networks available to which you can connect.)
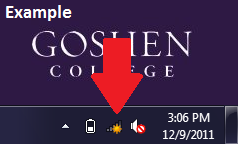
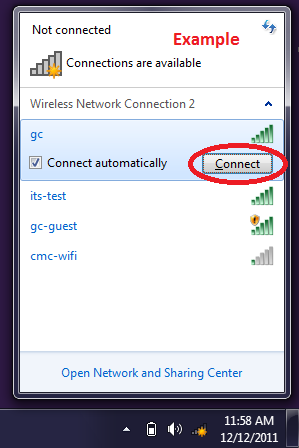
- To connect to a network, click on the “bar” icon. Available networks will appear as in the picture below (the list of networks will vary depending on your location, however if you are on campus, you should always connect to the “gc” network).

- Click on the network you want to connect to (“gc” if you are on campus). Once you click on the network name, a “connect” button will appear, as seen in the following picture. If you check the box to connect automatically, the computer will automatically reconnect when you turn the computer off and back on. (everything in red was added to aid in the instructions so do not look for the red circle on your screen)
- Once you have clicked connect, another dialogue box will appear in the bottom right hand corner of your screen. This box is to authenticate your GC username and password to allow you onto the internet. The box will appear as in the photo below.
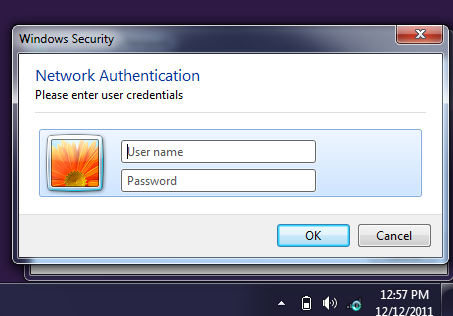
- In this dialogue box, enter your GC username and password and click OK. This will connect you to the internet.To make sure you are connected to the internet, the “bar” icon on the bottom right hand corner should appear like the picture below, or, you may open a web browser and try to go to a website.

- If you are using the laptop off-campus, you will need to follow the directions given by your location.
Connecting a Laptop to a Projector (Windows)
For Mac Projector help, click here.
*Note – Because of the variation among laptops and projectors, these instructions are only meant for equipment that has been checked out from ITSMedia.
- Make sure the projector power cord is plugged in securely, the power button on top is green, and the lens cap is off.
- Next, check the RGB cable connecting the laptop to the projector. To connect the laptop to the cable, you will need to use the adapter found in the checkout laptop bag. You will need to connect the small end of the adapter to the laptop.
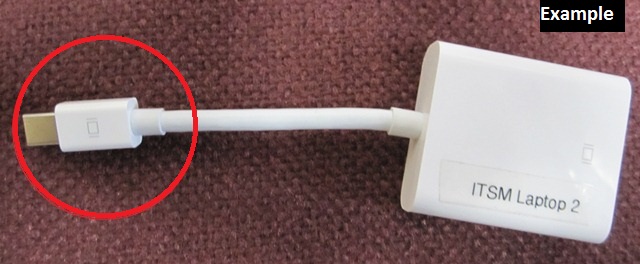
The small end of the adapter, as seen in the picture above, connects to the port on the left side of the computer that has the same icon as on the adapter. The location can be seen on the following picture.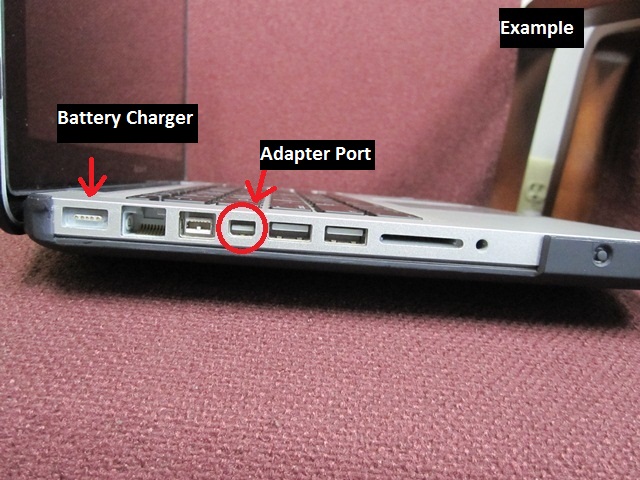
Then, the RGB cable connects to the larger end of the adapter, as seen in the following two pictures. The second is a closer view to help see all the connections.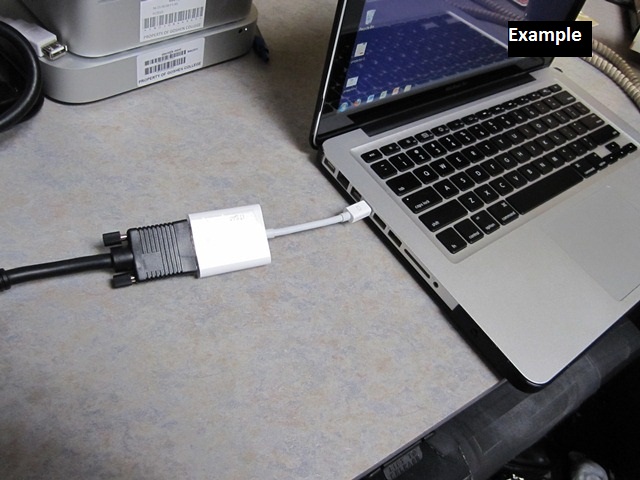
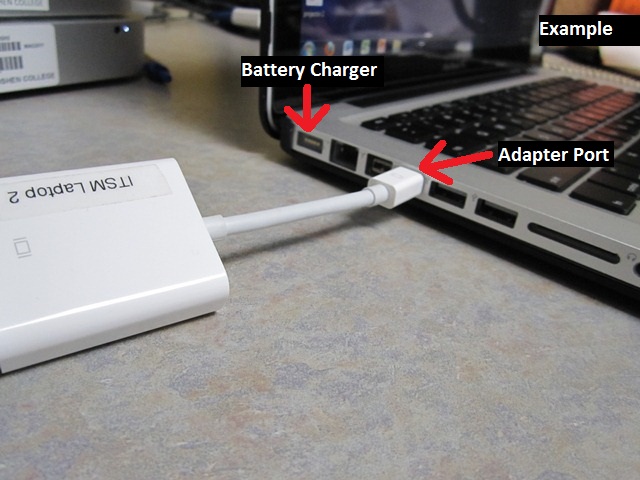
The RGB cable connects to the larger end of the adapter and then to the projector in either ‘RGB 1 IN’ or ‘RGB 2 IN’ as seen in the picture below.
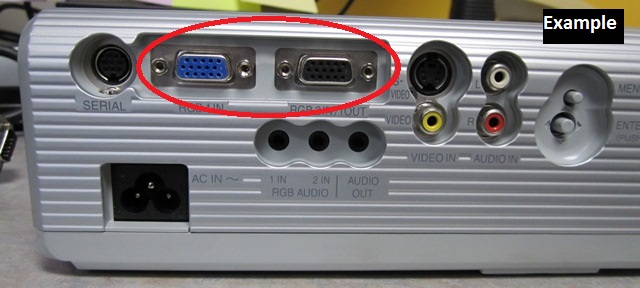
- Check the input on the projector. If the RGB cable is connected to ‘RGB 1 IN’ then the projector input should be on RGB 1. If it is connected to ‘RGB 2 IN’, then the input should match. You can check the input but using the remote or on the projector itself. On either one, there is an “input” button and this will show you what display you are using. If you press this button multiple times, it will scroll through the different displays.
- Check the output on the laptop. To do this, you till need to follow these instructions.
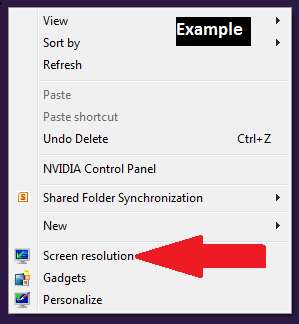
- Minimize your windows so that you can see the desktop of your computer (the purple screen). From here, you want to right click on the desktop, not on any icons just on blank space on the desktop (NOTE: to right click using Windows on a MacBook, you will want to place two fingers on the mouse pad and click with both fingers). A drop down menu will appear, as seen in the picture below. You will want to click on “Screen Resolution” in this menu.
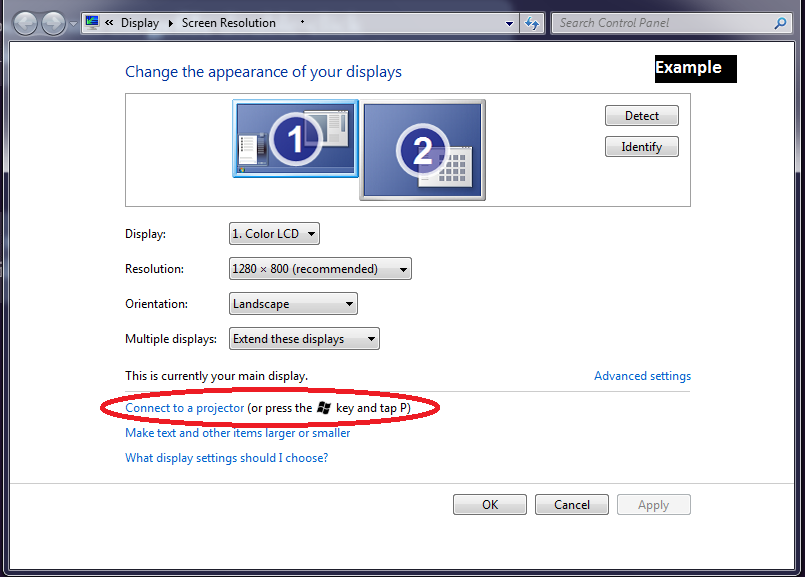
- A new dialogue box will appear on your screen. From here, you want to click on the “Connect to a Projector” option. It appears towards the bottom of the dialogue box, as seen in the picture.
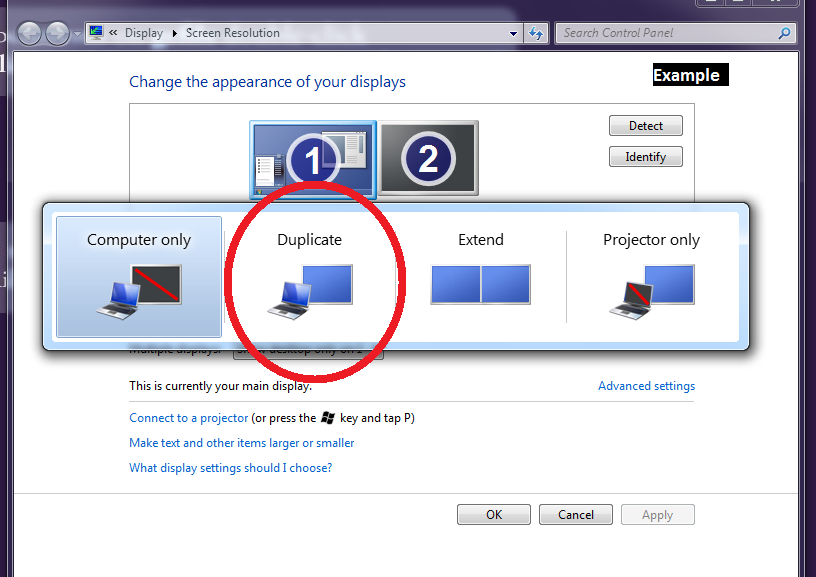
- When you click this, a one-rowed box will appear on top of the previous dialogue box. This will give you options about what you want displayed on your projector screen. If you want to see your presentation on both the projector and the computer screen, you will want to select “duplicate” as seen in the picture below. If you want to see the presentation only on the projector or have the displays extended, you may choose one of these options. “Duplicate” is the easiest way to view a presentation and still be able to see it on your screen to control it as well.
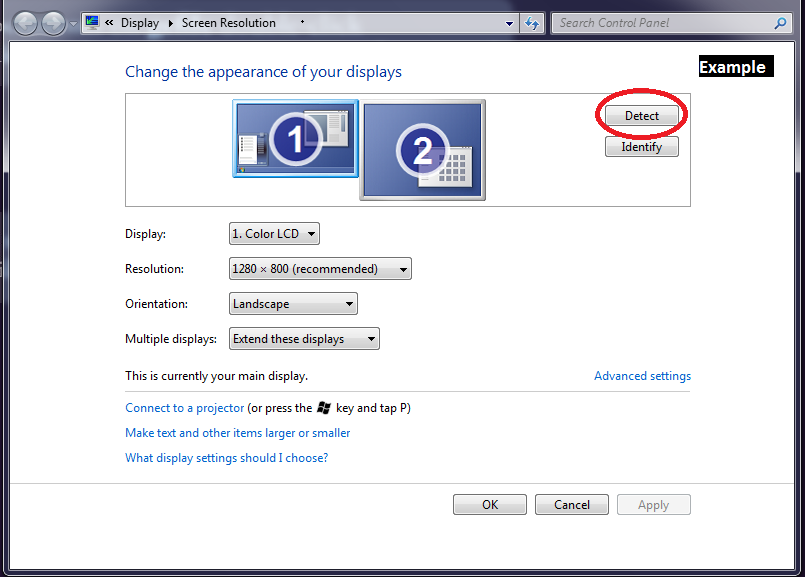
- Once you have selected your display option, you should be able to see your screen on the projector. If it did not work, it may be set to a different resolution. The easiest way to fix this is to press the “Detect” button in the dialogue box. It is on the top right hand corner of the dialogue box, as seen in the photo below. **If you do this, you may also need to repeat step 7 to duplicate your screen onto the projector.
*Hint: If you connect the RGB cable and turn on the projector before turning on the laptop, when the laptop is turned on it will change outputs automatically.*


